

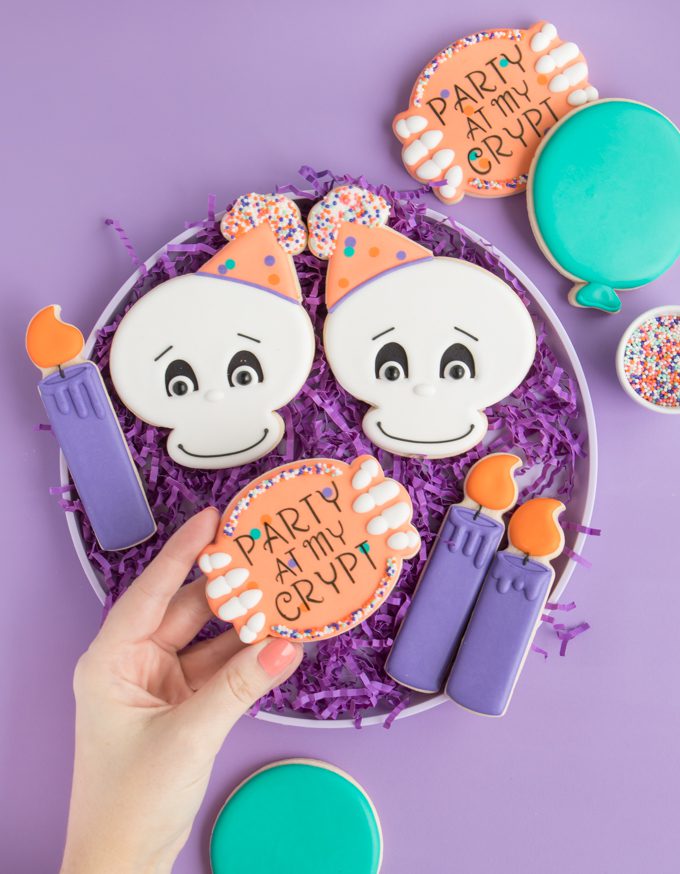
I don’t know about you guys, but I believe in cookie fate, some cookies were just meant to be! Or rather sometimes I’ve got an idea literally bursting out of my brain and I have to make it right now no matter how crazy it may be. Because who am I to try to control cookie fate? I also believe cookie ideas will never, ever run out. Typically every cookie set I make leads me to another idea. For example when I was making these tombstone cookies I thought of the saying “party at my crypt”. Because you know I can’t resist a good punny, I was basically in love with the concept. I loved even more that even after a google search I couldn’t find this saying anywhere. Punny, adorable, and unique? It had to happen! Even though it would have been a great saying for the tombstone cookies I knew this idea could be a theme on its own, and really should be because oh my cuteness right? I decided to use the “party at my crypt” theme along with Halloween skeleton cookies, balloons, and candles to bring it all together.
Just hours before baking these cookies I was asked if I could make a last minute cookie set for a Halloween birthday party. Why yes, yes I can! See guys…cookie fate. It was time to get my skeleton cookies on!
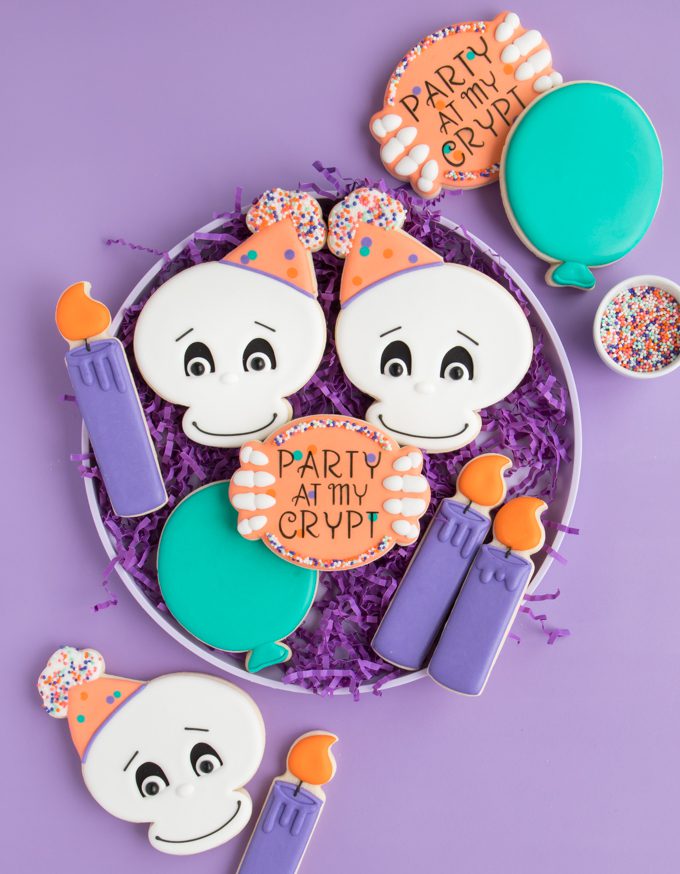
But we couldn’t just make Halloween skeleton cookies, these had to be ready to party! So naturally I added party hats, duh. For the saying “party at my crypt” I used a plaque cutter and a DIY stencil then added little skeleton fingers on the side also with the help of a DIY stencil. Both the plaque and the party hats matched with an orange confetti print, so easy to make yet always has a crazy cute finished look. I’ve also linked the cookie cutters I used in the “tools” section below. Although I love each of these cutters, as always I recommend to look around your stash for something similar that will work.
Ready to make some party ready skeleton cookies of your own? You can follow the step by step tutorial below and I have a few FREE templates for you! If you have your own cutting machine you can download
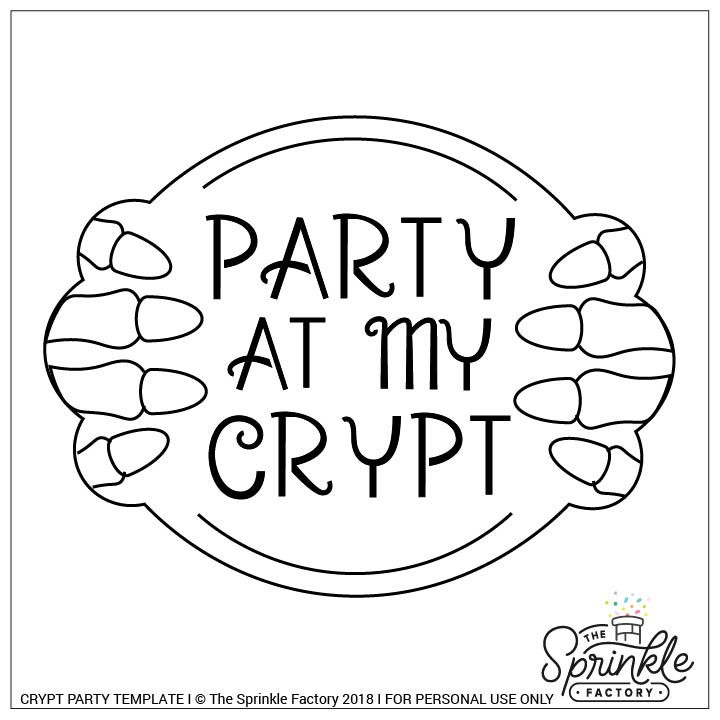
DOWNLOAD PARTY AT MY CRYPT STENCIL HERE
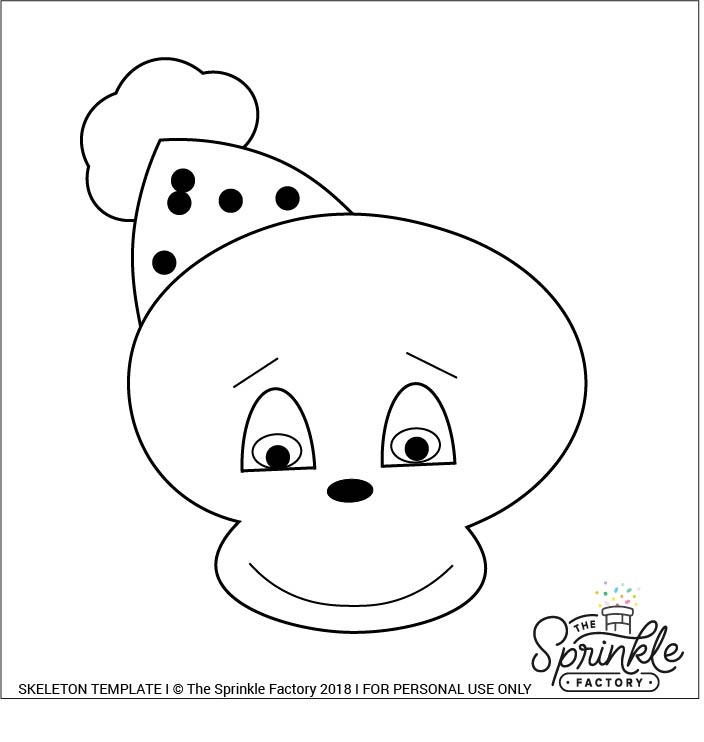
CLICK AND SAVE PROJECTOR/PRINTABLE TEMPLATES
HOW TO MAKE SKELETON COOKIES + PARTY AT MY CRPYT COOKIES
NEW TO COOKIES? BE SURE TO CHECK OUT THESE POSTS FOR THE BASICS:
ROLLED COOKIES 101 + ROYAL ICING 101
TOOLS
- skeleton cutter
- party hat cutter
- balloon cutter
- candle cutter
- plaque cutter
- edible marker
- face stencil (optional)
- tweezers
- piping bags
- #2 tips
- icing bottles
- coupler
- airbrush (optional)
SUPPLIES
- white outline icing + white flood icing
- purple outline icing + purple flood icing
- light orange outline icing + light orange flood icing
- teal outline icing + teal flood icing
- orange outline icing + orange flood icing
- black outline icing
- black airbrush color (optional)
- nonpareils sprinkle mix
- black sugar pearls
COLORS
- light orange – AmeriColor Peach + a touch of the darker orange icing
- orange – AmeriColor Orange + a touch of the lighter orange icing
- teal – AmeriColor Teal
- black – AmeriColor Super Black
- purple – AmeriColor Regal Purple
- black airbrush – AmeriColor Super Black
BAKE YOUR SKELETON COOKIES
First, you’re going to need to bake some skeleton’s wearing party hats. To create your own first cut out all of your skeleton cookies. Then use a party hat cutter and cut out party hats then trim them down with the top of the skeleton cutter. Lay the little hats right up against the skeleton cookies and press just lightly near their seam. Bake a minute longer than you normally would just in case and be sure not to move them until cool. I rarely have any cookies break when using this technique but when it does happen I simply “glue” the seam with icing and decorate like normal. Once they are dry you won’t know the difference.

DECORATE SKELETON COOKIES
Step 1: Time to decorate! Airbrush black spots for the eyes, or use black outline icing plus a scraper to scrape a little black icing on where the eyes will go. I happened to have an emoji face stencil, so I grabbed an airbrush and made it a quick process, however, both techniques work great.
Step 2: Outline the white skeleton face with white outline icing then flood with white flood icing. Don’t forget to outline the eyes as well so they remain black.
Step 3: Once the white of the skeleton cookie has crusted over, outline and flood the party hat. To create the polka dot confetti look I used, simply pipe additional colors of flood icing onto the wet (light orange) party hat icing. Use a small amount of white flood icing to create dots for the nose and eyeballs. Add black sugar pearls (or black icing dots) for the center of the eyes. The last step is to pipe on the skeleton mouth and eyebrows using black outline icing plus a #1 or #2 tip. (Don’t forget the projector templates above, they make this super simple.) Place cookies in front of a fan to dry immediately until the white has crusted over. Without this step, you may risk the black bleeding into the white.
Step 4: Once the rest of the cookie has crusted over, outline and flood the top of the party hat then cover in sprinkles. Be careful not to add too much icing here or the weight of the sprinkles may cause the icing to spill over off of the cookie.
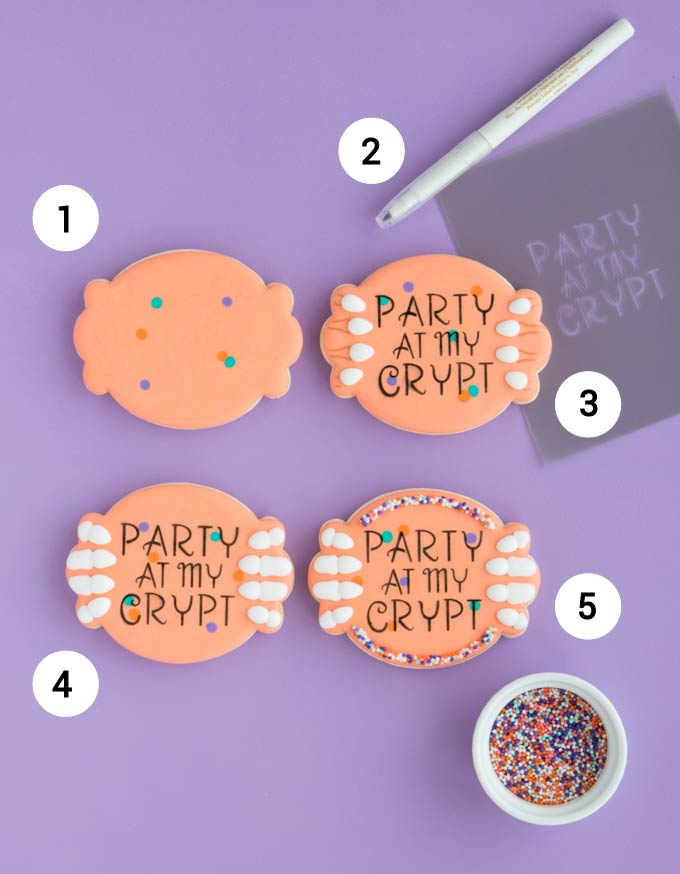
DECORATE PARTY AT MY CRYPT COOKIES
Step 1: Outline and flood plaque cookie with light orange. While still wet add a few dots of purple, teal, and dark orange flood icing to create polka dots. Let dry completely.
Step 2: Use the projector/printable template to outline the skeleton fingers first with an edible marker. Next airbrush the “party at my crypt” saying on using the stencil you’ve created with the downloadable.SVG file, or pipe it on with the projector template + black outline icing.
Step 3: Use a thick white flood icing (18 seconds works great) to pipe on the tips of the skeleton fingers. Let crust over before moving on to the next part.
Step 4: Once the tips of the skeleton fingers have crusted over, pipe on the remaining part of the skeleton fingers.
Step 5: Once the writing is completely dry and the fingers have completely crusted over, pipe on the final tip and bottom lines of the plaque design with white outline icing. Immediately cover in sprinkles while icing is still wet.
WANT TO CHECK OUT MORE HALLOWEEN SUGAR COOKIE TUTORIALS?
- Witch’s Brew Cookies
- Bone Cookie Sprinkle Shakers
- Spooky Cookie Flower Bouquet
- Pink Candy Corn Cookies
Heads up! To keep those legal gurus of the world happy, I need to inform you that some of the links in this post are affiliate links. In short – I may earn a small commission from the use of said link with no cost to you! But don’t worry I only link to stuff I use, love, and know you will too!


