

Hey sweet friends! I know, I know, it’s been a few weeks since I’ve shared a new tutorial. Over the past month I ventured back to the United States for the first time in two years to attend Cookie Con 2018 in Indianapolis. It was such a blast – gosh I miss America. Hopefully, if you weren’t able to attend you were at least able to get a few sneak peaks of all the fun on my Instagram stories. Now that all that fun has passed, let’s get back to sharing sweet stuff! Today I’m sharing a fun project I worked on with Sweets & Treats, Dinosaur cookies! Not just any dinosaur cookies though, this set is part of my candy corn cookie cutter series. Once again you can make all of these cookies with a simple candy corn cookie cutter!
Say hello to a new species of dinosaurs, The sprinkle-asaurus. Yes, it’s totally a thing.
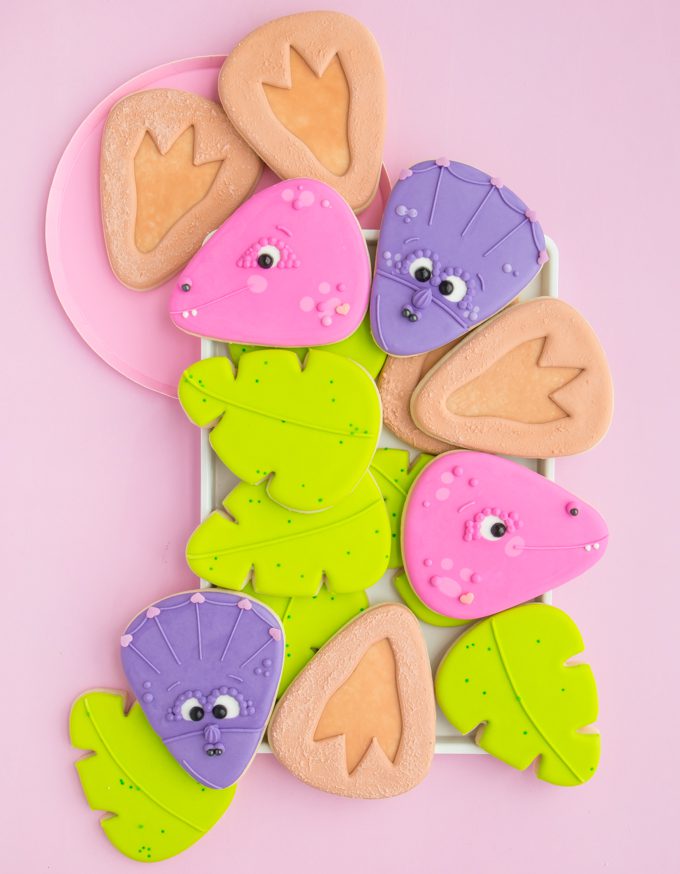
And to take it just one step further RAWR-some girly dinosaur cookies. Oh yea, dinos are for the ladies too. Like I said above recently I had the opportunity to create some dinosaur footprint cookies for Sweets & Treats Dinosaur Birthday Party Sweetscape and I thought they needed to be shared here as well! I used two of my favorite techniques to make the dinosaur footprint cookies. Spoiler alert, they are so darn simple! It also just so happens my two-year-old daughter is currently crazy for dinos so I thought I’d make a few dinosaur cookies in her favorite colors to add to the mix. Just before finishing them up I realized I had some cute little heart sprinkles that would give these dinosaur cookies the perfect finishing touch. Because sprinkles are always the perfect finishing touch.
Of course, I have all the details and step by step instruction below, but wait there is more! I’m officially kicking off my new projector cookie templates! Yay! Yay! Yay! Yes, you read that right. You will now be able to grab most of my cookie designs and tutorials as a projector or as a printable file. This means you can simply save the images provided at the bottom of this post and use them with your projector making these cookies an absolute breeze to create! Over the next week, I’ll be updating lots of old posts with FREE projector files. Check the FREE projector templates page to see which ones are available to use!

Now onto the tutorial. Once you’ve got the scoop don’t forget to scroll to the bottom of the post and click and save your projector files.
HOW TO MAKE DINOSAUR COOKIES WITH A CANDY CORN CUTTER!
NEW TO COOKIES? BE SURE TO CHECK OUT THESE POSTS FOR THE BASICS:
ROLLED COOKIES 101 + ROYAL ICING 101
TOOLS
- candy corn cutter
- edible marker
- tweezers
- piping bags
- #1 tips
- #2 tips
- 1 tip #18
- icing bottles
- couplers
- food safe sponge
SUPPLIES
- white 20-second icing
- black sugar pearls
- small black sugar pearls
- light pink flood icing
- pink outline icing + pink flood icing
- light purple flood icing
- purple outline icing + purple flood icing
- green outline icing + green flood icing
- tan outline icing + tan flood icing
- heart sprinkles (optional)
COLORS
- light pink – AmeriColor Deep Pink
- pink – AmeriColor Deep Pink
- light purple – AmeriColor Regal Purple
- purple – AmeriColor Regal Purple
- green – AmeriColor Electric Green
- tan – AmeriColor Warm Brown + AmeriColor Ivory

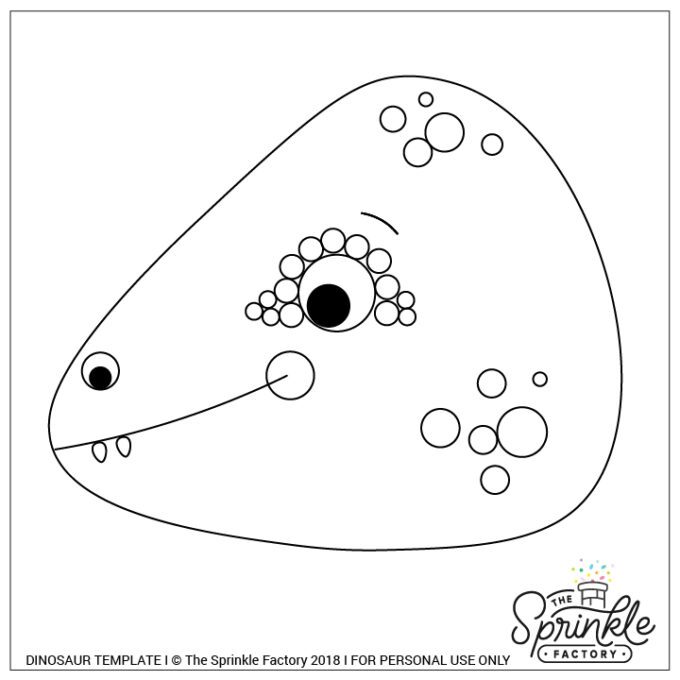
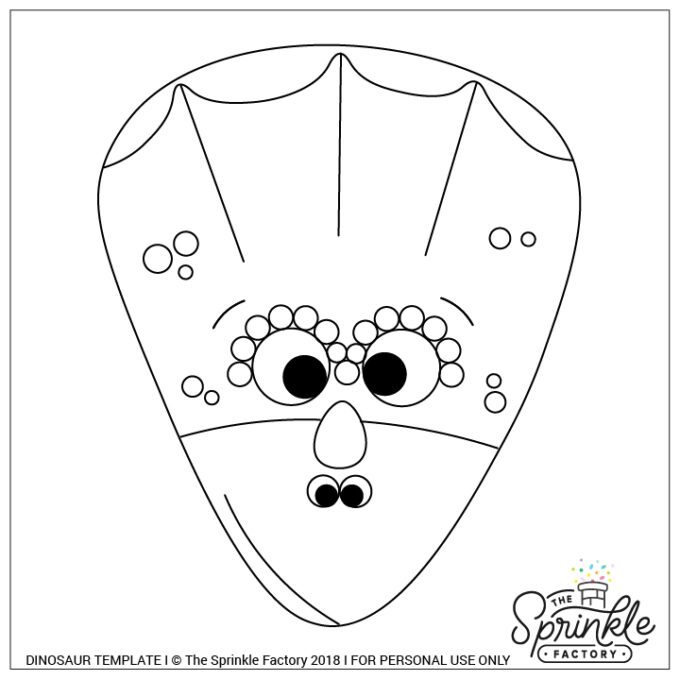
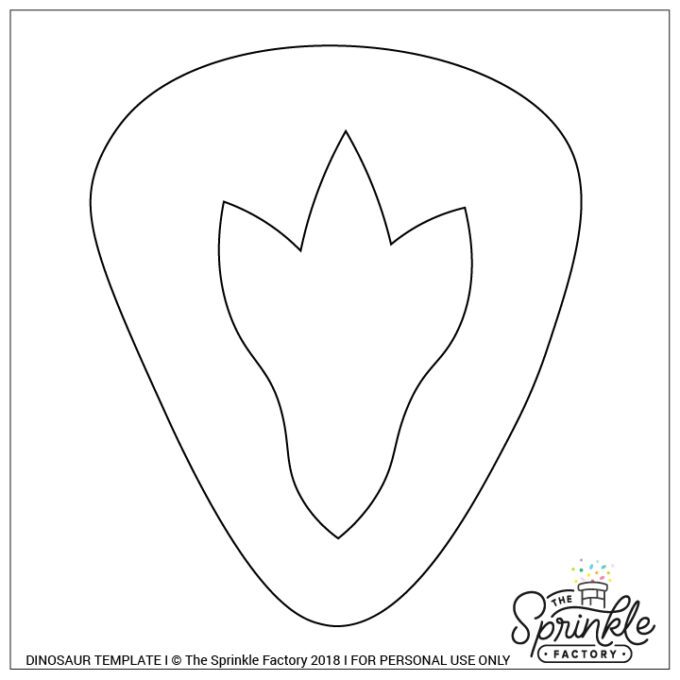
MAKE THESE DINOSAUR COOKIES SUPER SIMPLE BY USING THE TEMPLATES BELOW!
Step 1: Using a smooth scraping tool spread a thin layer of tan outline icing on a cookie and let dry.
Step 2: Once the thin layer of tan icing is dry use either the printable file or projector file below to trace the dinosaur footprint onto the cookie with an edible marker. (If using a projector you can skip the edible marker and pipe the outline.) Pipe the outline of the footprint and the entire outline of the cookie with the tan outline icing. Fill the outside of the footprint with tan flood icing.
Step 3: Let the footprint cookies dry overnight then use tan outline icing + a small sponge to dab on the texture over the top. If your icing hasn’t dried all the way you risk denting and cracking the bottom layer of icing.
Step 4: For the pink dinosaurs, outline the dinosaur’s face with pink outline icing then flood with pink flood icing. Immedietly after pipe a small circle of white 20-second icing where you would like the eye to go. Pipe a small dot of pink for the cheek under the white eye spot and a few light pink spots with light pink flood icing on the bottom and top of the dinosaurs head as shown above. Next, use the tweezers to place a black sugar pearl for the eye.If using any decorative sprinkles like my hearts above, you can add them now. Place cookies in front of a fan to dry immediately until the white has crusted over. Without this step, you may risk the black pearl bleeding into the white.
Step 5: Once the first pink layer has dried pipe on the details using outline icing. I used tip #1 for the mouth and tip #2 for the eyebrow, dots, and nose. For the nose simply pipe a pink dot then press a small black sugar pearl into the dot.
Step 6: For the purple dinosaur begin by piping and flooding the nose of the dino with purple outline + flood icing. This step is optional, however, it helped me easily place the eyes on each cookie for the next step. (If using a projector + template below this placement will be easy!)
Step 7: Outline + flood the rest of the purple dino using purple outline + flood icing. While the icing is still wet pipe circles for her eyes with 20-second white icing and small purple circles on her cheeks with light purple icing. Next, use the tweezers to place a black sugar pearl for the eye. Place cookies in front of a fan to dry immediately until the white has crusted over. Without this step, you may risk the black pearl bleeding into the white.
Step 8: Once the first purple layer has dried you can pipe on the details using outline icing. I used tip #1 for the mouth and tip #2 for the rest of the details. For the nose simply pipe a purple dot then press a small black sugar pearl into the dot. For the horn use a #18 tip + outline icing. Press on any sprinkle details you would like while outline icing is wet.
As promised here are the templates so you can make these cookies super simple! Just click and save then use with your projector.
NO PROJECTOR? NO PROBLEM! DOWNLOAD THE PRINTABLE VERSION BELOW
Just print, cut, and trace pieces to help make these simple.
PRINTABLE DINOSAUR COOKIE TEMPLATE
WANT TO CHECK OUT A FEW MORE CANDY CORN CUTTER TUTORIALS?
- Flamingo Cookies
- Nacho Cookies
- Toucan Cookies
- Pizza Cookies
- Watermelon Cookies
- Pink Candy Corn Cookies
Heads up! To keep those legal gurus of the world happy, I need to inform you that some of the links in this post are affiliate links. In short – I may earn a small commission from the use of said link with no cost to you! But don’t worry I only link to stuff I use, love, and know you will too!


