

Ah back to school. Sweet words to this mama’s ears. This summer I’ve taken quite a bit of time off to spend with my older girls while the tot is in daycare. We’re in that sweet in-between stage where they are old enough to do fun stuff with, but still young enough where they think doing it with me is cool. You gotta soak in that time guys it’s a short period. Although I’ve really enjoyed hanging out with the kiddos I am craving the routine that back to school brings. Apparently, my school loving girls are too because they’ve had back to school countdowns in their rooms for a month. Come to think of it, maybe they don’t think I’m that cool?! Meh, it’s fine. One thing I know for sure they still think is cool is me sending back to school cookies to their teachers and since we’re just a few days away from the first day it was time to make that happen!

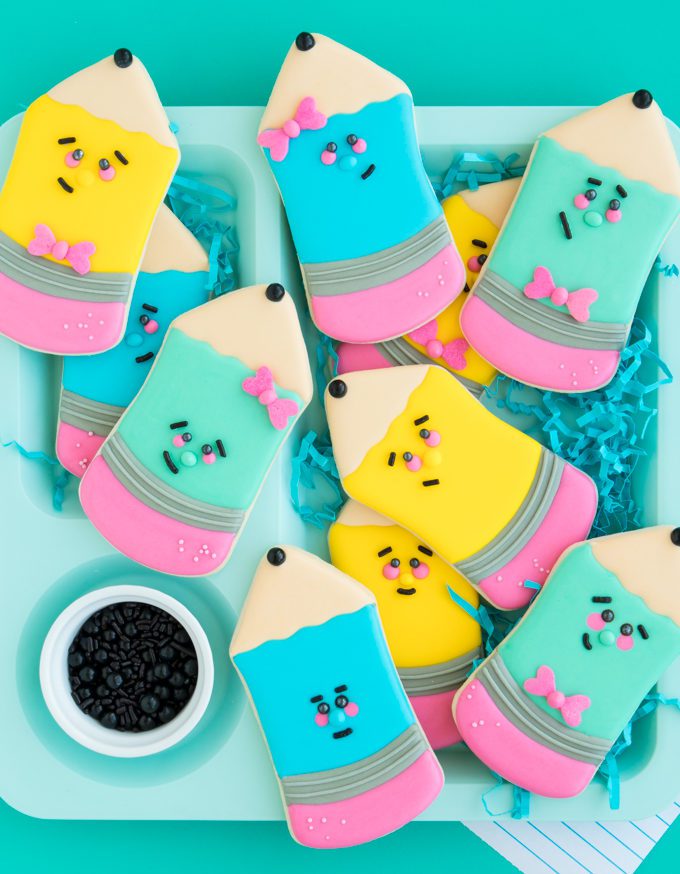
Que adorable back to school cookies – pencils cookies!
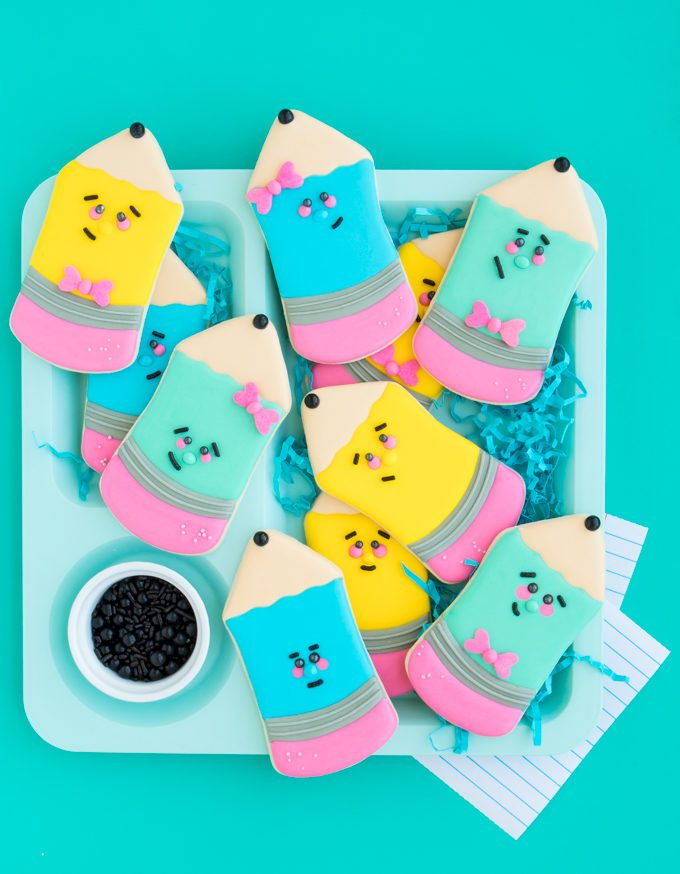
Here’s the thing. Pencil cookies are kind of a “staple” when it comes to back to school. I’ve made quite a few myself. As I’ve really focused on cookies this past year I’ve grown in my skill set + style quite a bit and I really want to take them on again for this year’s back to school cookies. Plus I just really just wanted to use another cookie pun “Let’s Get Sharp”.
You know there is just no resisting a good pun with me.
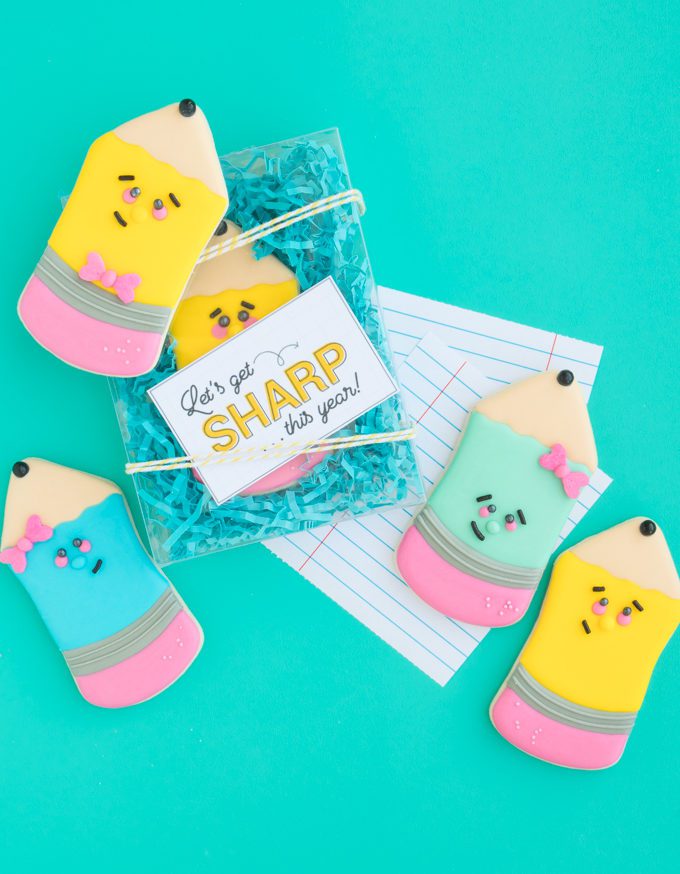
I had plans on putting the text on the pencil cookies but as I finished them up I wasn’t feeling it. These guys needed a personality! And so their little sprinkle faces were born. The little bow ties totally fell into place with the let’s get sharp back to school cookies theme. Which means I am sharing this printable along with the cookie tutorial with all of you!
DOWNLOAD THE FREE LET’S GET SHARP THIS YEAR PRINTABLE HERE
Have a cookie decorating projector? Great news! Here’s a projector template to make these cookies a breeze. Just click, save, project! 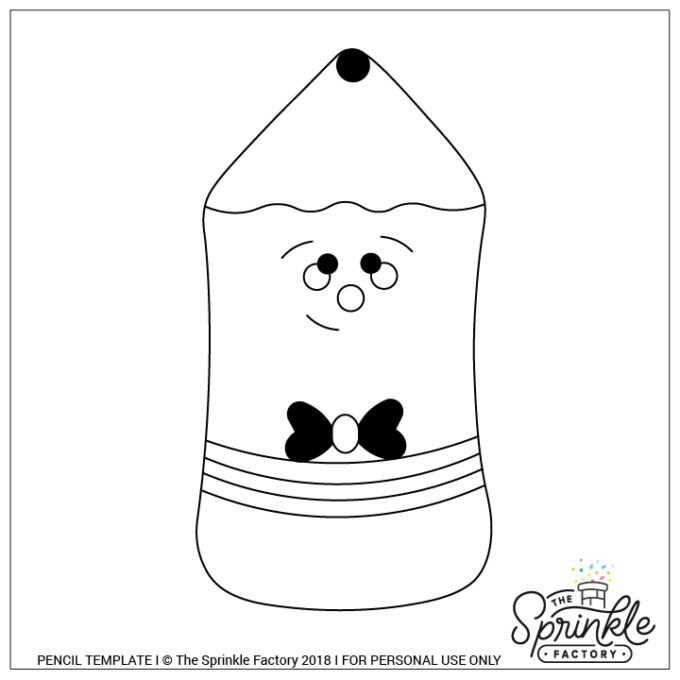
HOW TO MAKE BACK TO SCHOOL COOKIES – PENCIL COOKIES!
NEW TO COOKIES? BE SURE TO CHECK OUT THESE POSTS FOR THE BASICS:
ROLLED COOKIES 101 + ROYAL ICING 101
TOOLS
- pencil cookie cutter
- edible marker
- tweezers
- piping bags
- #1 tips
- #2 tips
- icing bottles
- coupler (use with grey outline icing)
SUPPLIES
- light tan outline icing + light tan flood icing
- black sugar pearls
- small black sugar pearls
- black jimmies (sprinkles)
- light pink outline icing + light pink flood icing
- blue outline icing + blue flood icing
- grey outline icing + grey flood icing
- mint outline icing + mint flood icing
- yellow outline icing + yellow flood icing
- large heart sprinkles
COLORS
- light pink – AmeriColor Deep Pink + AmeriColor Dusty Rose
- blue – AmeriColor Sky Blue
- grey – AmeriColor Stone
- mint – AmeriColor Sky Blue + AmeriColor Electric Green
- yellow – AmeriColor Electric Yellow
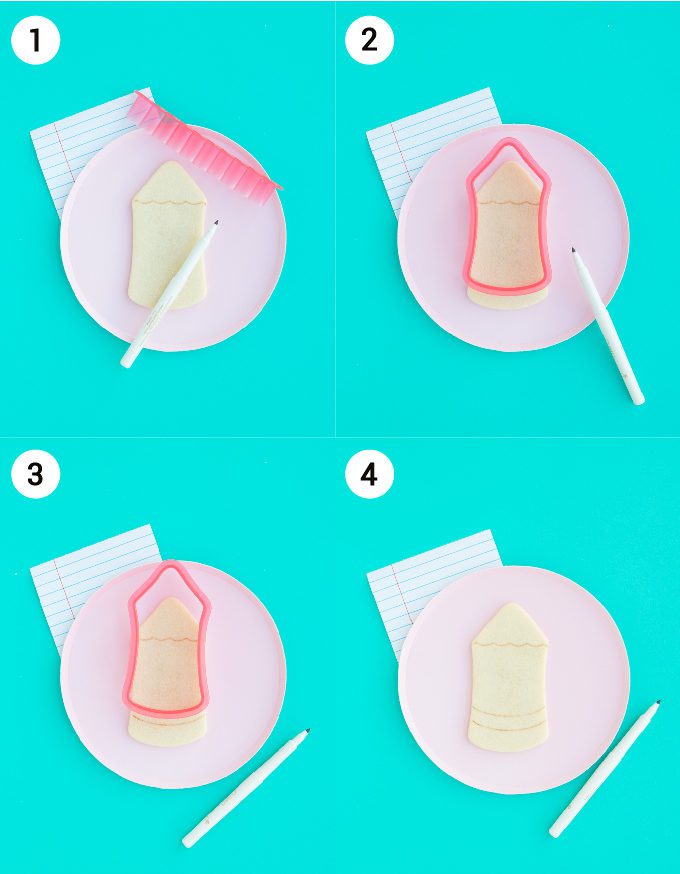
Below I’ll list the step by step information for how to decorate these back to school cookies. First, let’s take a look at how I used cookie cutters and an edible marker to create the outlines on the cookies first. For these pencil cookies, I used the Sugarbelle Pencil cookie cutter plus the scalloped edge cutter both available in the original Shap Shifters cookie cutter set. You can easily adjust and use whatever cutter you have available.
LET’S MAKE SOME BACK TO SCHOOL COOKIES!
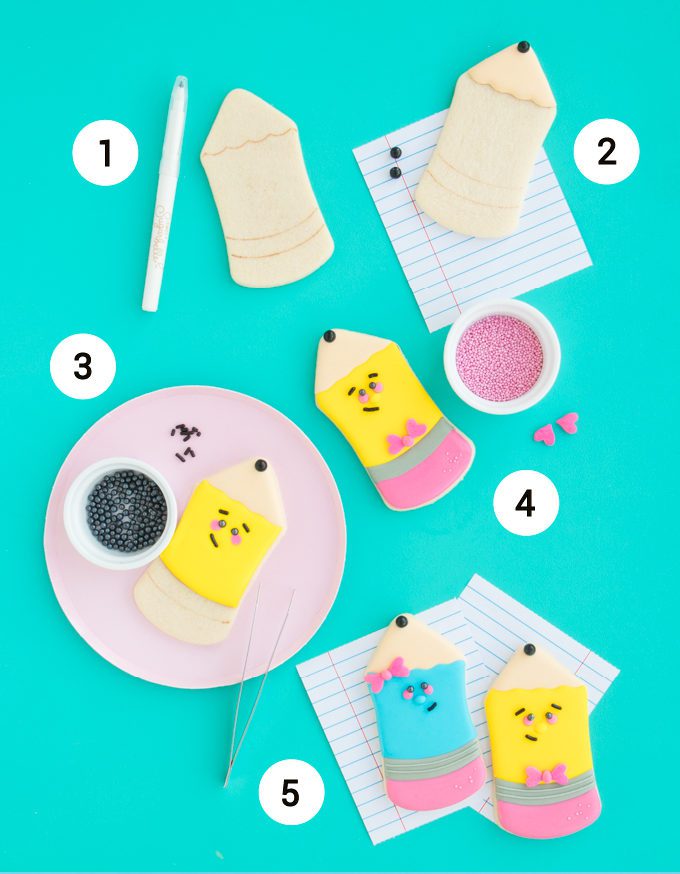
Step 1: Follow the previous photo to draw guidelines on the pencil cookie using the edible marker.
Step 2: Start by outlining the “wood” of the pencil cookie with light tan outline icing then flood with light tan flood icing. Drop a large black sugar pearl into the tip of the pencil cookie. Place cookies in front of a fan to dry immediately until the light tan has crusted over. Without this step, you may risk the black pearl bleeding into the light tan. I find my cookies are ready to move on in about 20 minutes.
Step 3: Once the light tan has crusted over, or dried completely it is safe to move on to the next step. Outline and fill the colored part of the pencil, I used yellow, blue and mint here. While this is still wet you can create all of the pencil cookie’s face except the nose. Use the pink flood to add “cheeks”, the use a pair of tweezers to drop small sugar pearls for the eyes, and then jimmie sprinkles for the mouth and eyebrows. Again place in front of a fan until this layer has crusted over.
Step 4: Outline and flood the grey area then outline and flood the pink eraser area. I didn’t wait for them to dry in between but you can certainly do that.
Step 5: Once the grey icing has crusted over it’s time to pipe on the final details. Use grey outline icing + tip #1 to pipe a few small lines across the grey pencil section. Finally, use a little pink outline icing to “glue” on two large heart sprinkles to form a bow. Finish with a dot of pink outline icing on top.
DECORATOR’S TIP: FOR A SMOOTH PROCESS MAKE SURE TO USE A COUPLER WITH THE GREY OUTLINE ICING. YOU WILL NEED TO CHANGE THE TIP FROM #2 FOR THE OUTLINE TO #1 FOR THE FINAL DETAILS.
I hope you guys love this pencil cookie tutorial for back to school cookies! I can’t wait to see you guys try these out and don’t forget you can download the FREE “Let’s Get Sharp This Year” printable for all of your back to school cookies! Download the printable HERE.
WANT TO CHECK OUT A FEW MORE COOKIE TUTORIALS?
- Flamingo Cookies
- Teacher Apprecieation Eraser Cookies
- Salad Sugar Cookie Platter
- Watermelon Cookies
- Popcorn Sugar Cookies
Heads up! To keep those legal gurus of the world happy, I need to inform you that some of the links in this post are affiliate links. In short – I may earn a small commission from the use of said link with no cost to you! But don’t worry I only link to stuff I use, love, and know you will too!


