

Sometimes blog posts are painful and complicated no matter the amount of sprinkles I use. Even when the project I’m working on is totally easy like these Rainbow Swirl Spring Cupcakes, which I made solely because 1. I have leftover rainbow frosting rolls from the Swirly Rainbow Cake and 2. I have a “habit” of making swirl cupcakes with leftover frosting. Not exactly a bad habit if you ask me. But back to why this post for these rainbow swirl cupcakes were so painful.
Memory cards. I swear they will be the death of me. They are worse then dishes. Half the time I seem to “misplace” my memory cards, though let’s face it they should really only be in 1 of two places – the computer or the camera. But the real reason they are such a pest is because they are just another source of clutter for me. Yep, digital clutter is a thing in 2018 guys. I am the worst about cleaning off memory cards. I will literally wait until my entire 16GB card is full of frosting filled pictures before I have to clean it out. Which I find out while I’m mid photo shoot, typically hovering over the setup on a step stool. Total disclosure here, even then I typically just delete “enough” photos to get me through that project. Please tell me I am not alone in this? Like WHY do I do this. Over and over to myself. Well I’ll tell you why, because I’m a total photo hoarder. And not with just dessert, for our family pics as well. My laptop, iPad, phone, desktop – all full of totally unnecessary photos I just can’t delete. I mean what if the 4 images I used out of the 100 I shot went missing from the blog, the computer, and my backup hard drive ALL at once. (eyeroll) So last week during my Friday studio clean up I told myself I was going to do the the proper thing with my photos from here on out. I cleaned up my computer folders, deleted all extras, and yes cleared and even formatted all of my memory cards. So they were squeaky clean. I was feeling pretty good. Right up until Monday when I realized the photos I took for this blog post were yep, missing from my computer. They pulled a Casper and vanished.
Like really. I mean really. The one time I actually take the time to digitally tidy up. I pay for it. Don’t worry this story obviously has a happy ending as your seeing these fun spring rainbow swirl cupcakes now! But only after and hour of searching through the depths of my desktop did I recover said photos, WHEW. I learned a big lesson guys.
Keep hoarding photos. Clearly it’s the right thing to do.
With that rant over. Let’s get on to these cupcakes. As I was blogging this Swirly Rainbow Cake, it occurred to me I didn’t really get a good shot of what these rainbow rolls as I call them, look like. And since frosting swirls are a staple around here I though it was time I not only show you how these guys look a little closer I should also give you a little video of how I pipe the swirls. It’s the same process no matter the dessert.
How to make rainbow frosting in a piping bag.
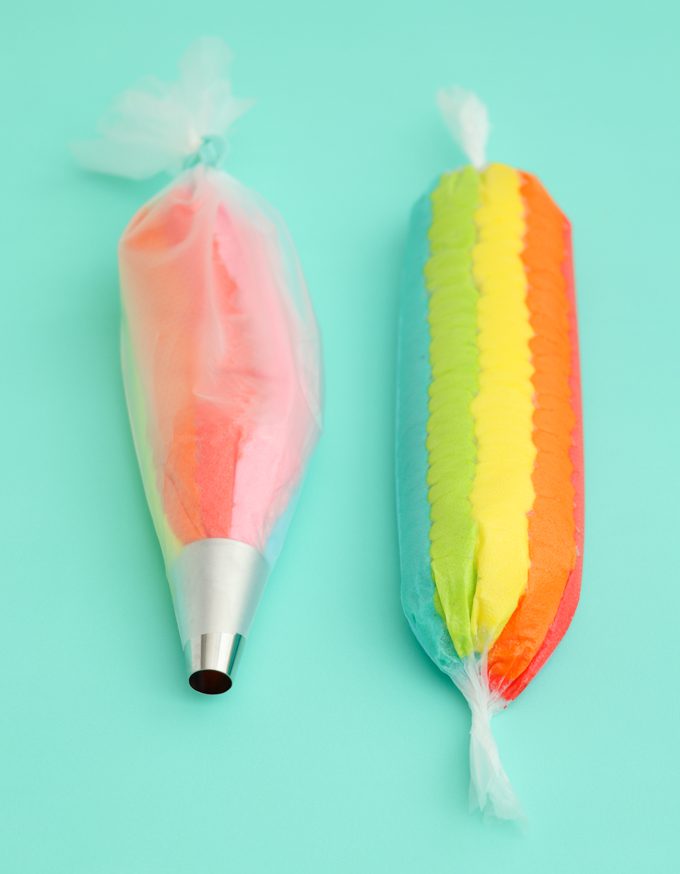
To put it simply, to create a colorful swirl effect all you have to do it put multiple colors of frosting in a piping bag. However, sometimes they can turn out to be a pretty mucky mess. So the trick to creating clean colorful mixed frosting looks is to first prepare your frosting on a sheet of cling wrap, roll it up, then place inside a piping bag. This gives you entire control of how the frosting it going to flow out.
I call this method making rainbow rolls.
If I am going to make a swirl with lots of colors I find it is best to first put each color into a piping bag then I pipe stripes of frosting about 1/2 an inch wide (each color) and 6-7 inches long side by side. If I am only using 1-3 colors I simply spoon them onto the cling wrap side by side in equal amounts. Once the icing is on the cling wrap I gently raise one side of the cling wrap up and fold it over lengthwise. I give the outside of the roll a gentle push with the flat side of my hand to compress and seal, then a quick smooth over the top to push out any big air gaps. From there I twist the bag ends shut and tie one end. Tying one end helps to keep the frosting moving only one way when piping. You can use regular saran wrap (recently called Satan Wrap by a reader) but cling wrap is heaven sent for these.
Notice I said I only pipe the rainbow rolls about 6-7 inches long. Any longer and you’re going to have a hard time piping with it. To cut down on time I prepare multiple “rainbow rolls” on multiple sheets of cling wrap all at once. This makes the process pretty quick. Each bag will pipe about 4-6 cupcakes. For the large swirls on top of the rainbow swirl cake I kept the same 6-7in length of the rainbow roll but after piping each line of frosting I then piped another one directly on top of it in the same color to make it twice as thick. This made the overall bag thicker but not longer. Which allowed me to complete the cake.
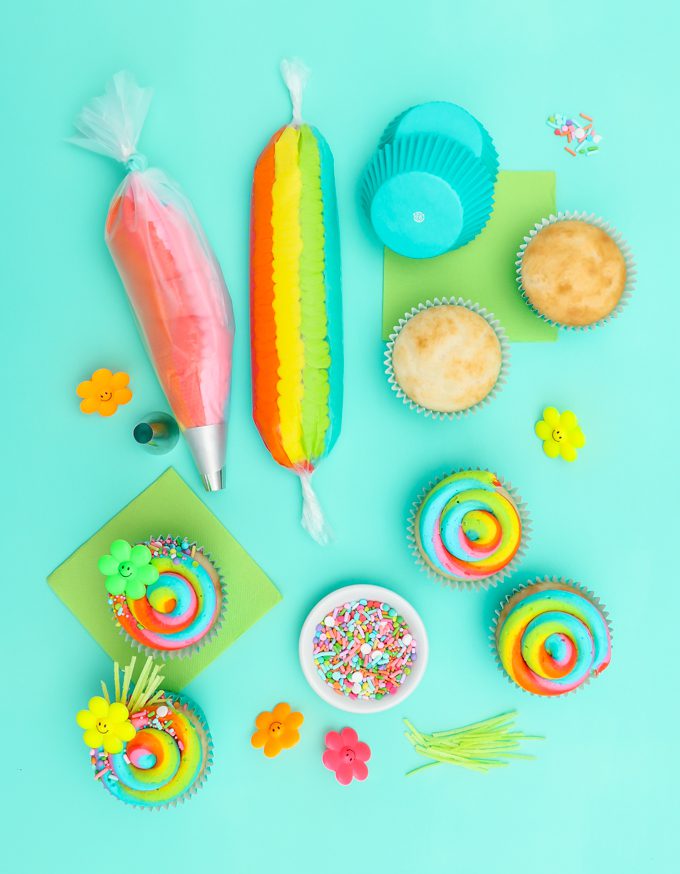
Now that you know how to make a rainbow roll of frosting let’s look at how I made these Spring Rainbow Swirl Cupcakes.
Supplies
- cling wrap
- colored frosting ( I used buttercream)
- piping bag
- large round piping tip (Wilton 2A)
- bag ties
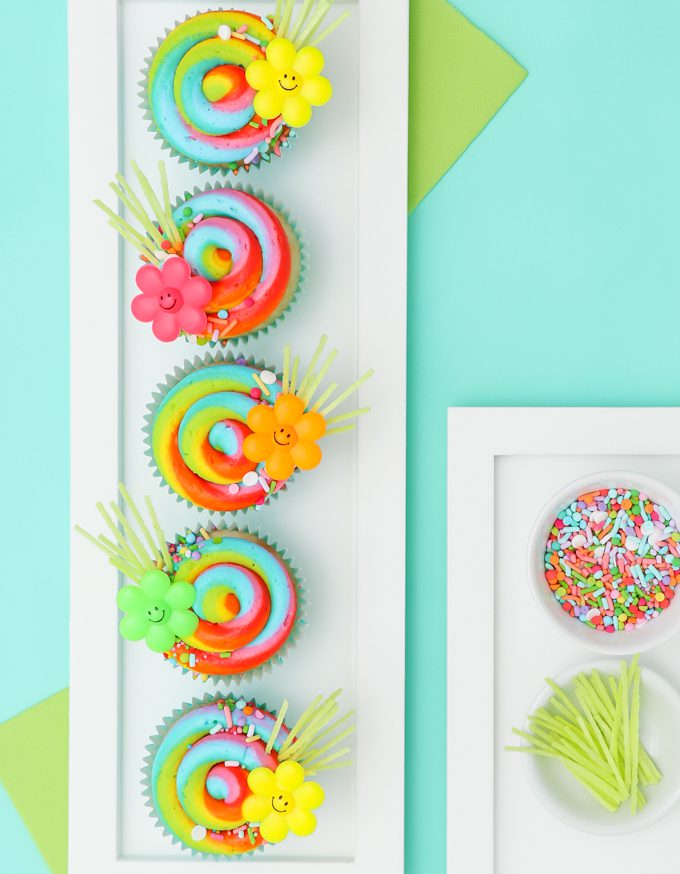
- edible grass
- sprinkles
- flower rings
- cupcakes
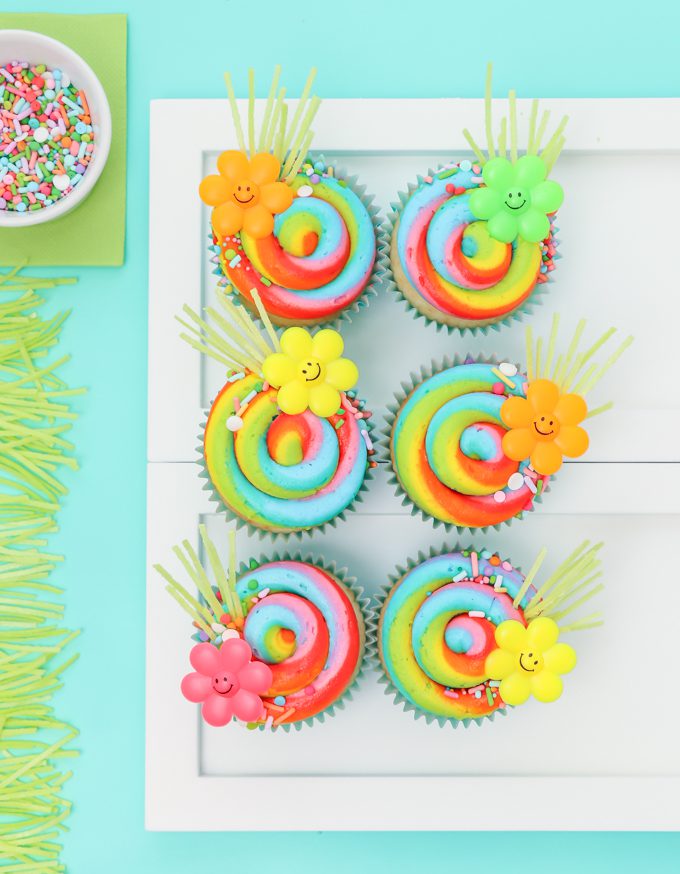
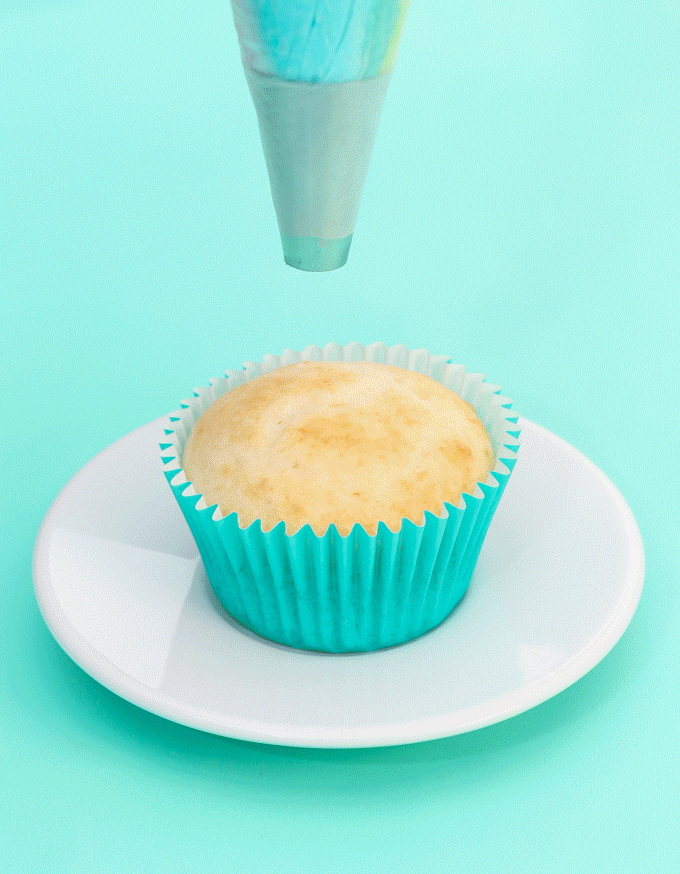
Step 1: Make your rainbow frosting roll. Place it inside a piping bag with a large round piping tip (Wilton 2A) tie off the end really well. First prime the piping bag by using out a little frosting until all of the colors and came out. To pipe the rainbow swirls onto the cupcake hold the tip over the center of the cupcake, just above the surface. Pipe out a little frosting letting it fall right onto the center. As soon as it makes contact behind to swirl the frosting around that center point. The key is to be gently guiding the piping tip around the cupcake but really letting the frosting fall behind the piping tip. Just before the end release pressure and let the very end of the swirl fall into place.
Step 2: Add sprinkles! You’ll want to do this while the frosting is still fresh so they stick.
Step 3: Chill cupcakes for 15 minutes. Once they have chilled your can place the rings on and bits of edible grass. Chilling the cupcakes keeps the swirl is a nice shape instead of smashing it with the toppers.
That’s it guys. These Spring Rainbow Swirl Cupcakes are seriously simple, but crazy cute! A little bit retro even?
And if you want to see even more swirled treats you can check out these posts as well!
Heads up! To keep those legal gurus of the world happy, I need to inform you that some of the links in this post are affiliate links. In short – I may earn a small commission from the use of said link with no cost to you! But don’t worry I only link to stuff I use, love, and know you will too!


