

Hey there sweet friends, boy do I have a fun new cake for you today. This week I attempted an idea that’s been SWIRLIN’ around in my sprinkle filled brain for some time now. I have a long lasting love for all things swirly on my desserts. I’ve made so many swirled treats I think it’s safe to say it’s becoming a signature look. I’ve put frosting swirls on cupcakes, on the side of cakes, and even made the actual cookie into a swirl. But one thing really just needed to happen. I wanted to cover the entire cake in a rainbow swirl, to basically make the most epic rainbow cake ever.
This past week it finally happened. Because would’t you know we celebrated our twin sprinklettes turning 8 this week. 8 already! For those of you that have been around here for awhile you might remember some of the other cakes I’ve made for them in the past here or here. But here’s the thing about 8 year old girls…they are always just a bit extra especially when you have two of them! 8 years is right about the age they want to play with all the glitter, the nail polish, the make-up, and you guessed it rainbows galore. So naturally I felt this was the perfect time to test out my swirling idea on a rainbow cake. Here’s the initial cake design…
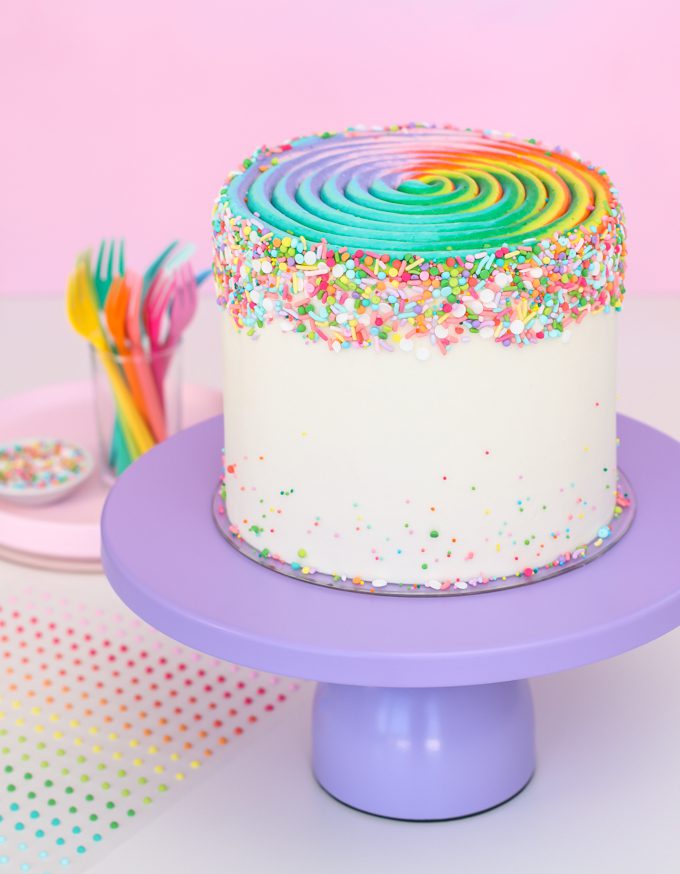
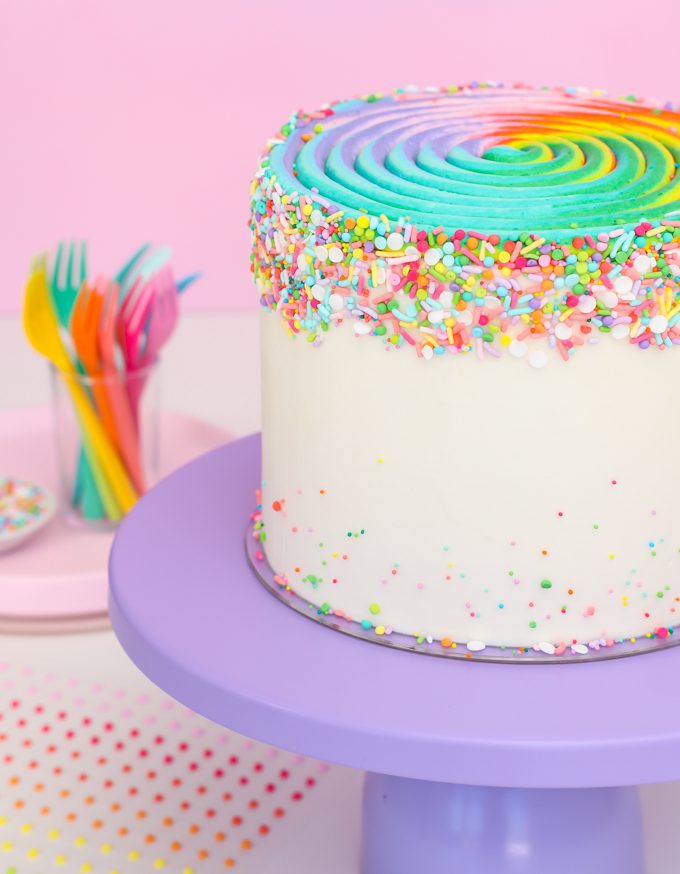
You guys I am so pumped to tell you I did this in ONE try. I was honestly unsure if this was even possible. The tricky part was going to be getting the frosting to flow out of the piping bag enough to get it ALL the way around without stopping. But before we go into the tricks and how to…did you guys notice the other extra special part of this cake? Those sprinkles? Not only are they a mix made with my homemade sprinkles I shared in the last post…they are on the top! Did you even notice? Sprinkle rimmed cakes are nothing new in cake-land-ia but they are always on the bottom. For this cake I wanted them on the TOP.
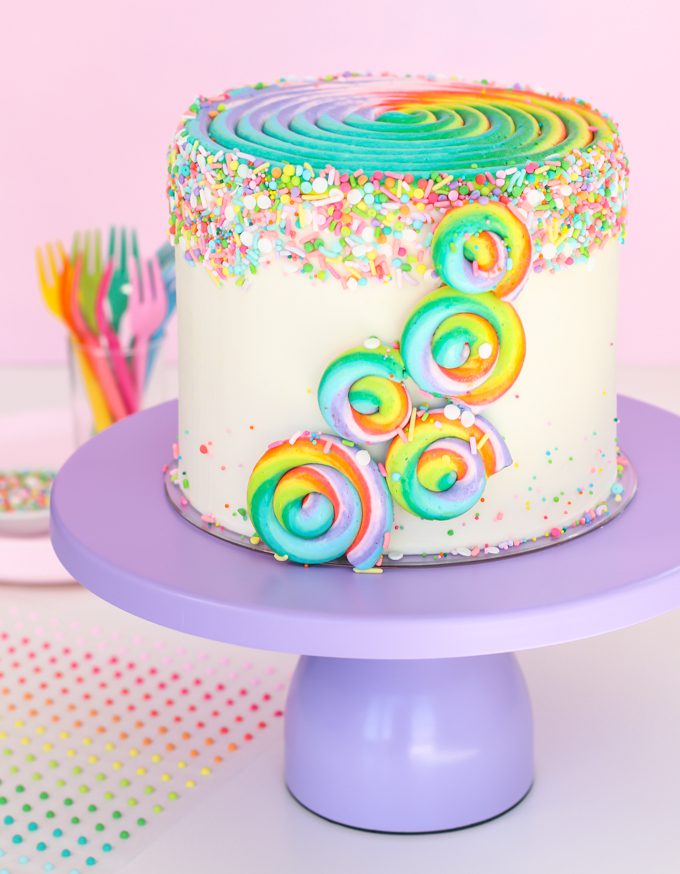
Then I decided to finish it up with rainbow swirls on the side as well. But I just couldn’t decide which I liked better with or without! So I posted these pictures on both Facebook and Instagram and would you know…the voters on Facebook said a very clear with. The voters on Instagram said a very clear without. So. Crazy.
The swirls are of course the show stopper in this cake. But before we get to the rainbow swirl part let’s take a quick look at the sprinkles on top. I will get a full post up on this soon. But incase you’re really wanting to try…here’s the not so secret steps.
How To Put Sprinkles “upside down” On A Cake.
Step 1: Frost cake smooth then place in freezer until frosting is firm about 20 minutes. Place a second cake board on top of the cake and FLIP the cake over.
Step 2: Place the upside down cake on a large cookie sheet (to catch sprinkles). Using a small icing spatula or a small flexible scraper smooth a bit of buttercream where you want the sprinkles 1/4 of the way around your cake. Gently use a cupped hand and scoop sprinkles onto the fresh buttercream. Separating it into sections helps keep the buttercream still fresh and “sticky”.
Step 3: Quickly flip the cake back over.
Decorator’s Note: You want to do your sprinkles first before any other decoration.
Now on to the rainbow swirl cake feature.
There are two key factors to making these swirls. 1. Frosting consistency. 2. Air pockets.
- Consistency – The fact is you can change up the frosting, the colors, the size, but the key to making these it getting them stable and smooth. You want to make sure the frosting you are using is able to hold it’s shape, very little to no “settling” once pipped. For these I used my buttercream recipe with 6 tablespoons on milk. You can see them here in swiss meringue as well, I actually love how smooth they were with the swiss meringue.
- Air pockets – Air pocket will ruin these guys faster then you would believe Because you really need to be able to pipe a continuous line of frosting. To prevent this first make sure you smooth out any extra air pockets from you frosting after you whip it. Do this by folding it with a spatula for a few minutes. The next is to make sure you’re not whipping in too much air when colors. Try to fold your color in as well instead of taking a spatula and “whipping” the color in. The last air pocket issue to watch out for, a the most important, is in the piping bag. Be careful to make sure the icing you are adding to the piping bag is pressed in there really well and together. Then when your piping bag is filled gently work the piping bag to make sure there is no extra air. Finally squeeze out a good little blob of icing prior to beginning your rainbow swirls.
Supplies
- colored icing at a sturdy pipping consistency
- plastic wrap
- pipping bag
- smooth paper towel (optional)
Tools
- ruler
- medium round piping tip (Wilton 2A)
How To Pipe A Rainbow Swirl Cake.
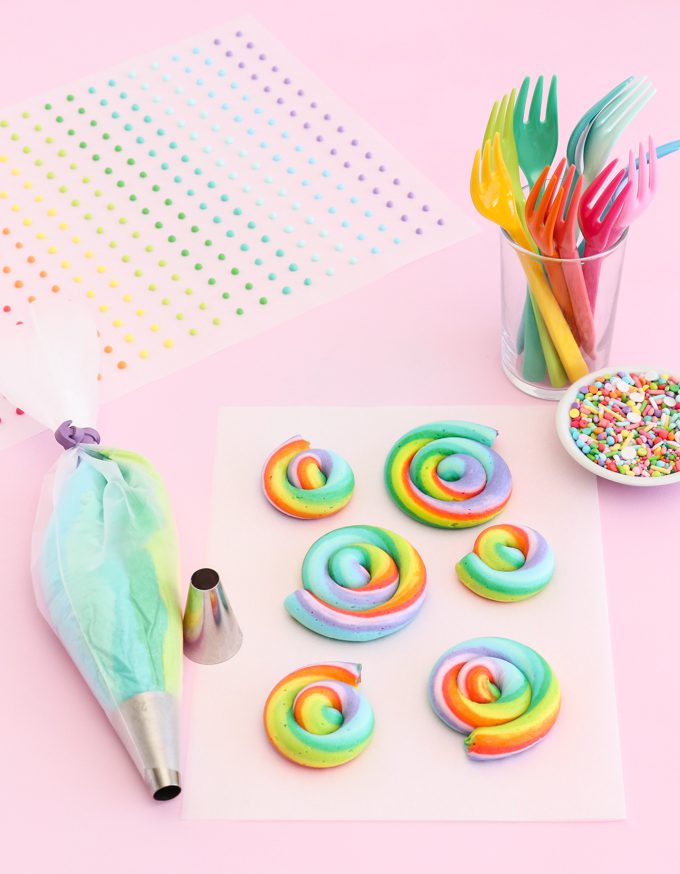
Step 1: To prepare your icing you will need to make what I call a “rainbow roll”. Lay out a piece of plastic wrap (about 12 inches long) and pipe or spoon on rows of frosting. (you can see a better shot of how to do this here). Piping the frosting into perfect rows isn’t a must, but you will get a much cleaner and more even swirl + less air pockets. You want your icing to be piped out to about 8 inches long and 1 inch high. There’s no real magic amount here but you want to make sure you have enough to fill a piping bag.
Step 2: Gently roll up the icing long ways and then twist the ends. Tie one end. Slid the other end into a piping bag with a medium round piping tip, Wilton 2A. If your icing is feeling a bit soft from all the work place the entire piping bag (rainbow roll) into the fridge for just a few minutes to chill.
Step 3: Use the ruler to mars the very center of your cake. Push a little icing out of the rainbow roll to remove initial air pockets and get the colors flowing. Begin by holding the tip just over the center of the cake. Apply a steady pressure to the piping bag allowing the frosting to gently touch the center of the cake, then slowly guide the frosting around the center. Keep going around and around and around! The key is to let gently guide the icing with the tip while letting it fall behind you. At some point you may need to use your second hand to add pressure to the piping bag since you can’t readjust your hand.
This is the point I was literally holding my breath! Haha! For reference this cake is a 7in cake, I’m not sure I would try it with a bigger cake, not with one steady line at least. In the future I think I’ll repeat this technique but on smaller 6in cakes. I’m pretty sure they would be super easy.
Step 4: To finish of this rainbow swirl cake with a seamless look, with a gently cupped hand I added sprinkles to the outside rim of the rainbow swirl as well. This allowed tiny bits of sprinkle to fall down to the bottom of the cake which really completed the whole thing!
Now about those swirls on the sides.
This is a technique I first tried on this Cotton Candy Cake. I took it one step further with this Rainbow Swirl Cake and brought them all the way up. In hindsight, the swiss meringue icing on the Cotton Candy Cake was much easier to do this effect with. It’s lighter and didn’t worry me one bit. The buttercream however is a bit more dense and while it totally stayed on my Rainbow Swirl Cake…I might fear these high swirls on a cake that has to sit out for a long time of travel.
To make the extra swirls all you have to do is pipe smaller swirls with your leftover frosting onto parchment paper. Place them in the freezer until firm then “glue” them on to the cake with extra icing. I like to them take a clean smooth paper towel (Viva brand) and use it to press them fast again the cake.
I really loved how this rainbow swirl cake came out, and I hope you guys try one of your own! Don’t forget to tag me so I can see as well. #teamsprinkle
Want to see more swirled treats?
Heads up! To keep those legal gurus of the world happy, I need to inform you that some of the links in this post are affiliate links. In short – I may earn a small commission from the use of said link with no cost to you! But don’t worry I only link to stuff I use, love, and know you will too!


