

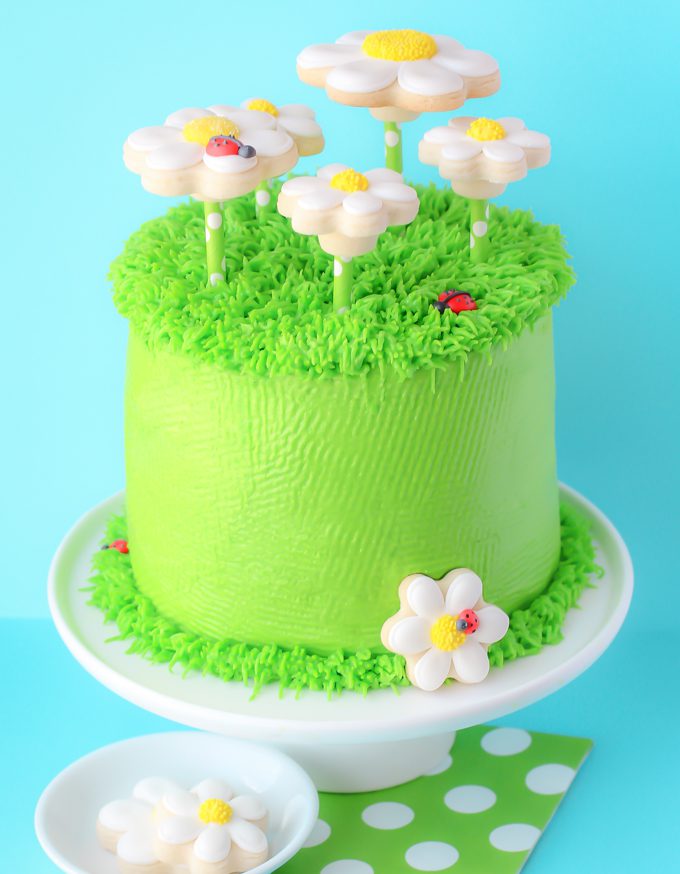
Last week I shared with you guys a fun new Daisy Cookie Bouquet, I had a blast making them. After all edible flowers are the best kind of flowers! But while I was photographing them I thought, man why didn’t I stick these in a cake…or even made dirt pudding in the pot? I just new I had to try out one of them with some extra flowers and well, we were long over due for a little cake around here. And so the creation of this Daisy Cake happened!
BAKE A DAISY CAKE
The truth is, I can’t even remember the last time I made an actual cake! To keep this cake nice and simple I whipped up a Duncan Hines Chocolate Cake Mix, a batch of Decorator’s Buttercream dyed bright green, and then some of my favorite chocolate buttercream to fill it with. Then of course finished it up with some Daisy cookie pops which I explained how to make here. Since this cake wasn’t going anywhere but in our tummies I made a small but tall 6in cake (3 layers).
Ready for a little cake inspiration?
SUPPLIES
- chocolate cake layers
- decorators buttercream
- chocolate buttercream
- green gel coloring
- grass decorating tip
- piping bag
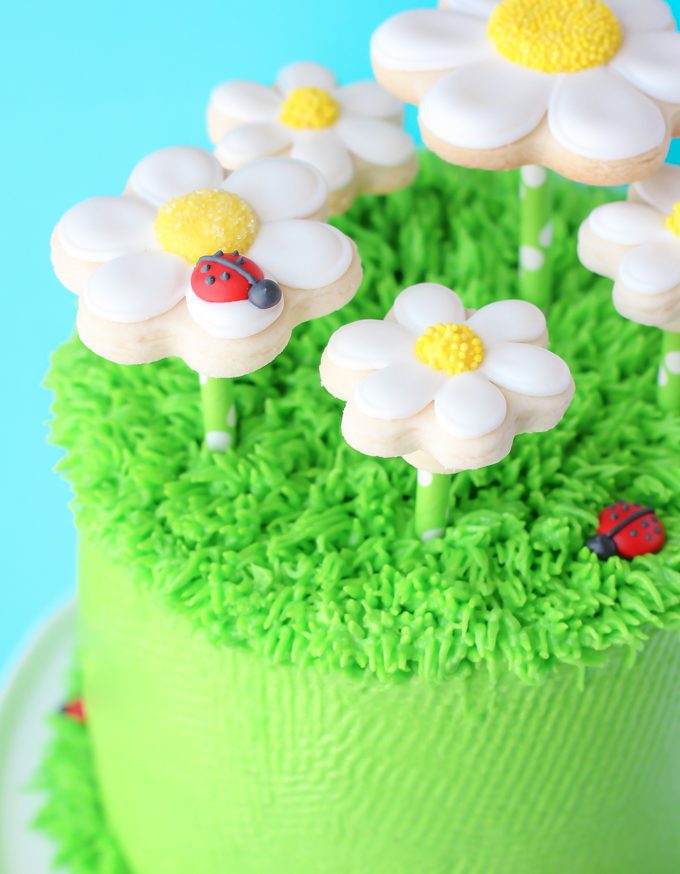
- cookie flower pops
- angled cake spatula
- cake smoother
- paper towel
Step 1: Bake, cool, and level each cake layer. Any of your fav chocolate cakes will do. I used 3 6in layers here. Make a batch of decorators buttercream and color green. Make a half batch of chocolate buttercream.
Step 2: Once cool fill cake layers with chocolate buttercream.
Step 3: Stack the layers up!
DECORATE DAISY CAKE
Step 4: Using an angled spatula ice entire cake, then smooth with smoother. To get the bumpy texture all over the cake I let it crust over in the fridge for 15 minutes and then I used a textured paper towel and a cake smoother. Just place the paper towel on the cake (after it’s crusted a bit) and them run the smoother along the cake to leave the little dents. This gave it kind of a grass texture.
My cake icing was definitely less then stellar…either I’m really out of practice or maybe I shouldn’t have frosted this cake 15 minutes before needing to leave the house. Heh.
Step 5: Using a grass tip, begin piping “grass” around the border of the cake and all along the top. You can start on the inside and work your way out or on the outside and work your way in. I find the best way to pipe grass is keep the tip close the the cake, apply pressure and gently but quickly pull up while decreasing pressure. If you haven’t pipped grass before try it out a little bit on some wax paper. It’s really pretty simple. The great thing about this technique is if you “mess up” some grass you can always scrap it off and pipe right over it!
Step 6: To finish up push some of your Daisy Cookie Pops into the cake! If you have a few extra lady bugs, they can hang out in the grass to up the cuteness factor.
Heads up! To keep those legal gurus of the world happy, I need to inform you that some of the links in this post are affiliate links. In short – I may earn a small commission from the use of said link with no cost to you! But don’t worry I only link to stuff I use, love, and know you will too!


