

One of the things I’m most proud of since we’ve launched The Library is how quickly and efficiently we’ve been able to get our members who are totally new to 3D printing cookie cutters, actually printing cookie cutters. Don’t get me wrong, The Library is pretty freaking epic…it is FULL of adorable cookie cutter files (and growing each Tuesday!). But how much good are those files if cookiers are struggling to actually print those cookie cutters on their own? For most we’ve cut down the learning curve from weeks to literally hours. For Library members, once they’ve built their printer there are only a few things they really need to understand and learn before they can start printing cutters like a crazy person. And with over a 1,000 cutters in The Library at just 8 weeks after opening…you’ve got a whole lot of printing to do! Although you may need to learn a few things as you go, the most important thing you will need to learn to print 3D cookie cutters right away is how to level your 3D printer bed. That’s right girls, today we’re talking all things bed leveling your 3D printer.
WHAT IS BED LEVELING ON A 3D PRINTER?
No matter what .STL file you are going to print, whether its from The Library or another source, you will need to learn how to level your 3D printer bed right away before printing anything. Unless you have a delta style printer (Silhouette Alta) bed leveling a 3D printer is simply raising and lowering each corner of the 3D printer bed so that the nozzle is always at the correct height/distance from the bed. Bed leveling a 3D printer insures that you have a nice first layer for all the layers there after to lay on top of.
WHAT IS THE CORRECT NOZZLE HEIGHT?
Although we’re going to talk about how to level your 3D printer bed below, it’s important we first talk about what is the correct nozzle height and what does it look like. Although we are actually raising and lowering the print bed when leveling we’re really doing so to get the correct nozzle height/distance from bed to nozzle. Understanding what the correct nozzle height looks like is key to getting good prints. We could totally geek out on technical aspects of nozzle height but chances are, if you’re here, you’re just wanting to learn how to print cookie cutters and we can get by with just the basics.
When you have the correct nozzle height your filament should be extruded as shown in the second option below. You don’t want your nozzle hovering above the filament or digging into the filament. You want it at just the right height to the tip of the nozzle about even with the top of the filament line. Imagine you have a small round metal piping tip and you gently pressed the tip with a pair of pliers. The icing would no longer flow out round like a spaghetti noodle, or flat like a fettuccini, it would be just slightly “squished”. That slight squish is what we’re looking for. The proper nozzle height, will give you that perfect “squish”, which is important for bed adhesion and creating nice strong layers that adhere together.
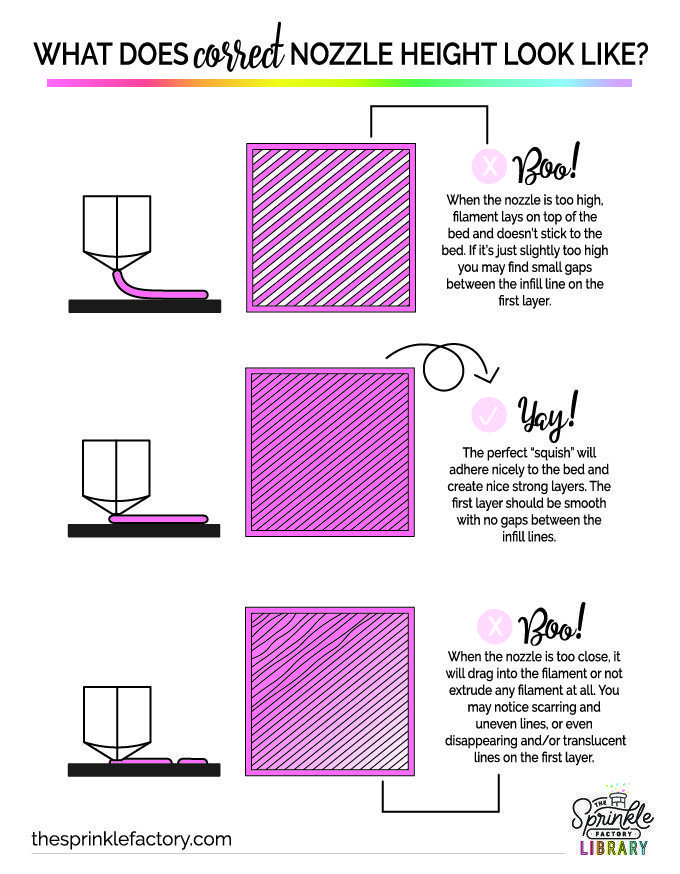
If your bed is way too low your going to have filament extruding everywhere and not sticking aka a filament bird nest! (We see this SOS call a LOT!) If your bed is way too high your nozzle will scrape on your mat extruding very little, or no filament at all.
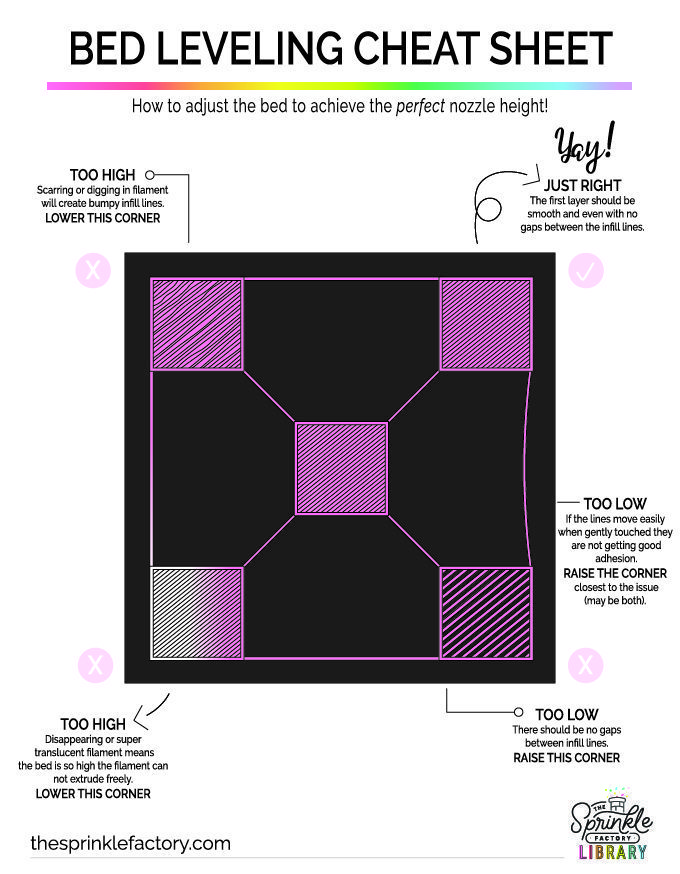
Now that you understand what you’re looking for, let’s learn how to level your 3D printer bed. First I recommend following the bed leveling video by 3D printer YouTube Guru, CHEP. He shares 2 files with you. The first will help get your nozzle height close without actually extruding filament…and then his square file will get you printing. (YAY!) When you’re printing the square file, you’re looking for nice lines that stick to the bed even when gently touched. When you are able to print the entire set of squares with nice even sticky lines, you bed leveling is going to be pretty darn good! However, we have found with our members that this process alone isn’t quiet enough. Before printing a cookie cutter, I recommend to print this final file. Then use your new understanding of nozzle height and the cheat sheet below to fine tune your bed leveling.
If it’s your very first time using your new printer you may be confused on how to use these files! To print a gcode (a file that’s already been sliced in a slicer) simply download the file and move to your mini USB card that came with your printer. Place the memory card in your printer and open from the memory card option.
Use the cheat sheet above to spot common issues and then adjust the knob(s) closest to the issue(s). On our most commonly used printer, The Ender 3 Pro the direction is printed right on the knob!
TURN THE KNOB CLOCKWISE TO RAISE THAT CORNER
TURN THE KNOB COUNTER CLOCKWISE TO LOWER THAT CORNER
Continue to turn each knob raising and lowering the bed on each corner. If you’re careful you can do so while it prints. You can also pause the print. The reason why I love using this square file is because it gives us a chance to not only check single lines from side to side and center, but also get a feel for what a great infill looks like on a proper first layer. It’s often easier to spot bed leveling issues inside these squares for beginners and experienced printers.
YOU’VE LEARNED HOW TO LEVEL YOUR 3D PRINTER BED – NOW WHAT?
Now it’s time for the fun stuff! The next step it to get setup and comfortable with a slicer program and learn to adjust the settings within the program to print cookie cutters. Don’t worry Library members we’ve got you covered! In the resource center we have step-by-step video for you to get setup printing in Cura as well as download our settings so you can start printing perfect cookie cutters in just a few minutes!
I hope this helps you guys get ready to get those printers out of the box, and get printing. Stay tuned for more 3D printing cookie cutter basics!


