

Is anybody else secretly counting the days to Thanksgiving? Not because of the Turkey and all the amazing food of course, because of what comes afterThanksgiving. No, not the crazy American tradition of wandering around as food stuffed zombies at all hours of the night to buy things things at crazy low prices either. We’re talking about that time when it’s finally totally socially acceptable to play Christmas songs and put up those Christmas trees. Officially CHRISTMAS TIME! So maybe I should wait until after the Turkey makes his big debut to start posting Christmas posts. Maybe, but it is my blog…and we’re getting this Holiday party started today! With cupcakes of course, because that’s how you get any party started. More specifically these Holly Berry Christmas Cupcakes!
Oh and it’s six days in case your counting…
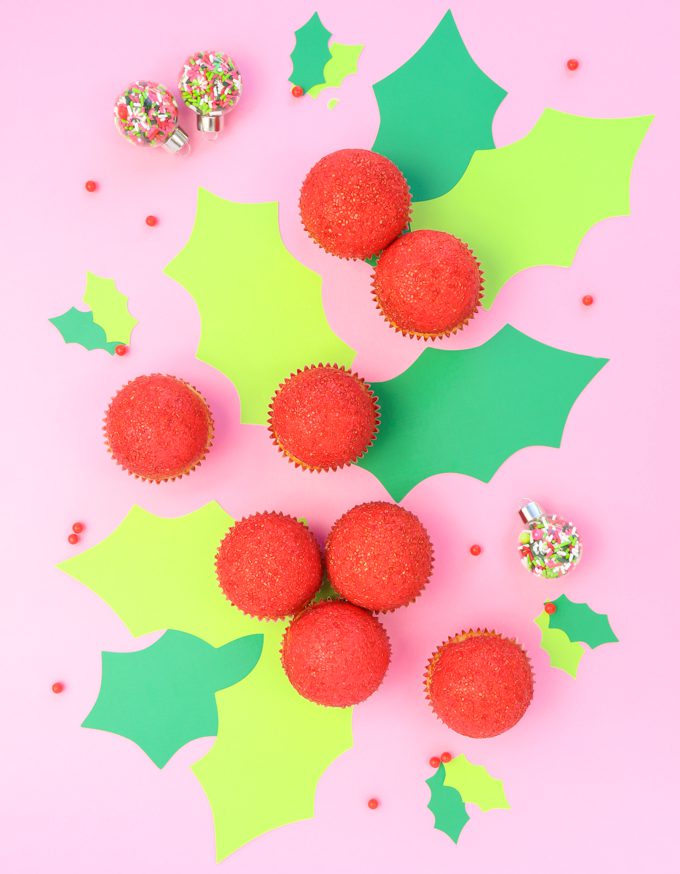
Are these not SO much fun! I made these cupcakes to feature in Sweets & Treats’ Holly Jolly Sweetscape. (Be sure to check it out, we had so much fun with it!) And I am just so in love with them! So easy yet so darn cute. The tops are just rounded red frosting shaped and rolled in red chunky sugar crystals. Then I placed them on paper holly leaves for display cut from a Silhouette machine (affiliate link!). Eeek I can hardly take the cutest! Talk about an easy Christmas display. They would be so cute as a wreath!
Let’s take a look at how easy they are to make.
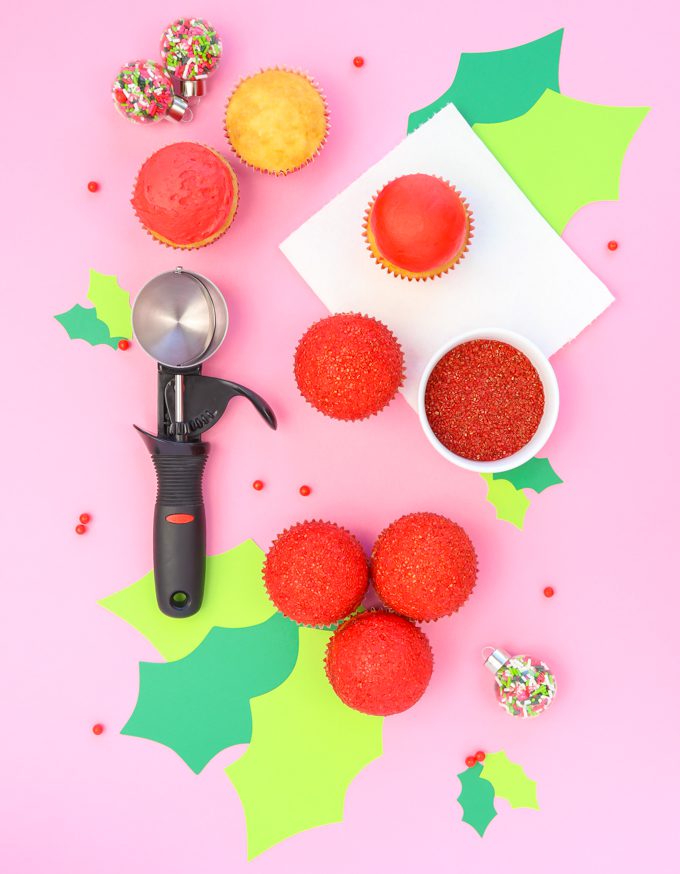
SUPPLIES
- cupcakes
- red buttercream frosting
- large round ice cream scoop
- paper towel (a smooth towel like viva works best)
- red chunky sugar crystal sprinkles
BAKE CUPCAKES + MAKE FROSTING
Step 1: First your going to bake up your cupcakes, any of your favorites will do. You will also need a nice crusting buttercream colored red, I recommend this one here. I like to use this gel coloring for my red frosting. It doesn’t need to be super dark red.
Step 2: Scoop red buttercream on top of cupcakes. Place in fridge to chill for about 10 minutes. You want it to firm up a bit but not be stiff.
Step 2: Once buttercream has chilled, shape and smooth buttercream with a clean smooth paper towel.
Step 3: Roll cupcake in sprinkles then shape a little more with paper towel if needed.
TADA! That’s all.
So easy right guys? The key here is to keep them chilled enough to work with them but not so cold then won’t shape and the sprinkles won’t stick. If you over chill them just let them sit out a little bit to soften. And can I let you guys in on a little secret? These could totally be Rudolph noses OR with a small addition, Christmas bulbs! So fun right?
Heads up! To keep those legal gurus of the world happy, I need to inform you that some of the links in this post are affiliate links. In short – I may earn a small commission from the use of said link with no cost to you! But don’t worry I only link to stuff I use, love, and know you will too!


