

I just glanced at the calendar, which says that October will be here in 2 days. Clearly something has gone wrong, my phone must obviously having a moment. Because just yesterday we were welcoming September, right? That was yesterday right guys? Where is a darn old school paper calendar when you need it. For cereal guys I have NO clue where this month has went. I may or may not have been too caught up in making treats this month, like these Balloon Animal Skeleton Halloween Cookies!
Apparently in the midst of new school activities, building & installing a studio kitchen, working on holiday projects, and uh raising 4 compact humans (one of which is full blown toddler lever) I’ve completely lost a month! How does that even happen. Sigh. I can’t even believe it. And to make matters worse, since Halloween isn’t a “thing” here in Germany the stores are FULL of Christmas and winter things. I want pumpkins! I went out to search for faux pumpkins to paint for the house. Not a single pumpkin or skeleton to be found. It’s a good thing I control the content around here. Because Halloween is my FAV holiday to bake for. And since the sketchy calendar does say it’s almost October, let’s get our Halloween on!
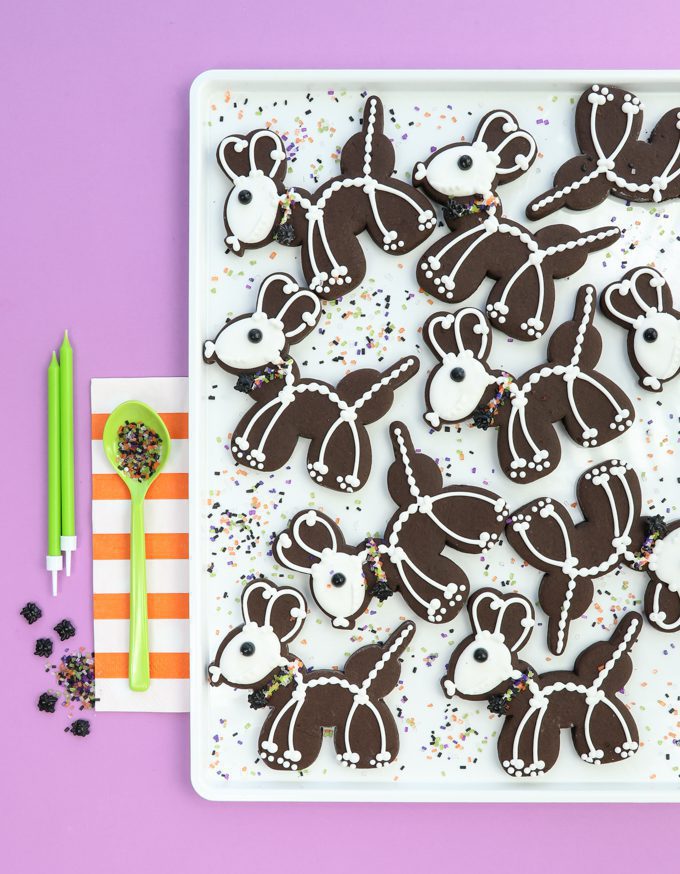
Today I’m checking in with just a super cute, a little but twisted, and easy Halloween cookie idea, balloon animal skeletons! Because spooky really can be incredibly cute. And I know what your thinking, but it’s true balloon animals really do have…toes. These cookies are obvious scientifically sound. Which also might explain why I’ve never managed to successfully form a balloon animal in my entire life…
BAKE COOKIES + MAKE ICING
What I love about these cookies it, you guessed is, they are SO easy. I started off with my favorite black chocolate cookie recipe (below) adapted from Lila Loa’s original version here using one of my favorite cookie cutters, this balloon animal here. One of the things I love to do at this time of year is to substitute some of the regular cocao powder for black cocoa powder! For this particular cooke I did a half and half combo and I LOVE the way it came out.
Even the frosting was easy! For these little boney guys I used a soft piping royal icing, a #2 tip, and a pointed tool. So darn easy. Of course I couldn’t leave them without sprinkles, obviously. So I added a few black sugar pearls for eyes, a mix of Sweets & Treats chunky sugar crystals for collars, and then a few Spider sprinkles for spooky little tags. (don’t forget to add the collars last when the other frosting “bones” have had a little time to crust over so the sprinkles only stick to the wet icing!)

DECORATE
This design is pretty much self explanatory. One little tip is to start with the spine. I simply piped a row of dots from the neck to the tail then took my needle tool and gently drug it across all the dots to connect them. After I piped the skull. After giving those two spots a little time to dry I was able to easily add the rest of the detail. Since you already have the spine, head, and outline of the actual balloon animal cookie it’s easy to get the rest in place!
RECIPES
- Rolled Chocolate Cookies
(adapted from Lila Loa’s) - royal icing
SUPPLIES
- sprinkles
- black sugar pearls
TOOLS
- balloon animal cutter
- piping bag
- small round piping tip
CHOCOLATE ROLL OUT COOKIES WITH BLACK COCOA

These cookies are practically a copycat oreo cookie in a roll out form! Absolutely perfect for Halloween cookies.
- 1 cup butter
- 1/4 cup shortening
- 1 1/2 cups powdered sugar
- 2 large eggs
- 2 teaspoons vanilla
- 1 teaspoon salt
- 3/4 teaspoon baking powder
- 1/3 cup cocoa
- 1/3 cup black cocoa
- 3-3 1/2 cups flour
-
In a medium mixing bowl whisk together, salt, baking powder, cocoa, black cocoa, and flour. Set aside.
-
Cream together butter shortening.
-
Add powdered sugar and mix well.
-
Mix in eggs and extract.
-
Mix in dry ingredients until everything is fully combined and the dough comes together. IF you are planning on using the recipe right away you may add in up to 1/2 cup more flour so the dough doesn’t stick to your finger tip. If you going to let chill for a bit leave it at 3 cups.
-
Roll out about 1/4 in thick and cut into shapes. Bake on a parchment paper lined cookie sheet at 350F for 6-10 minutes. (these guys took 9 in my oven)
Heads up! To keep those legal gurus of the world happy, I need to inform you that some of the links in this post are affiliate links. In short – I may earn a small commission from the use of said link with no cost to you! But don’t worry I only link to stuff I use, love, and know you will too!


